Every car owner has experienced that sinking feeling – you walk up to your vehicle in perfect lighting and suddenly notice swirl marks catching the sun, or that shopping cart scratch you’ve been ignoring has somehow multiplied into a web of fine lines across your door panel. Your once-pristine paint now looks dull, scratched, and tired.
Here’s the good news: what looks like permanent damage often isn’t. What you’re seeing is likely in your vehicle’s clear coat, not the actual paint – and that means it can often be corrected, restored, and brought back to a condition that rivals the day it left the factory.
Paint correction is both an art and a science, and at Wraptix Autospa, we’ve mastered the techniques that can transform even heavily damaged paint into a mirror-like finish that stops people in their tracks.
Understanding Your Vehicle’s Paint System
Before diving into correction techniques, it’s crucial to understand what you’re working with. Modern automotive paint isn’t just a single layer – it’s a sophisticated system designed for durability, appearance, and protection.
The Paint System Breakdown:
- Primer: Bonds paint to metal and provides corrosion protection
- Base Coat: Provides color and coverage
- Clear Coat: Transparent protective layer that provides gloss and durability
Most visible damage – swirl marks, light scratches, oxidation, and water spots – occurs in the clear coat layer. This is excellent news because it means the damage can often be corrected without touching the actual colored paint beneath.
The Common Culprits: How Paint Gets Damaged
Understanding how damage occurs helps prevent future issues and explains why correction is possible:
Swirl Marks and Micro-Scratches
These circular patterns are typically caused by:
- Improper washing techniques (using dirty wash mitts or towels)
- Automatic car wash brushes that trap dirt and drag it across the paint
- Dry wiping dust or debris from the surface
- Poor quality microfiber cloths or towels
Linear Scratches
Straight-line scratches usually result from:
- Shopping cart encounters in parking lots
- Key scratches (accidental or intentional)
- Tree branches scraping against the vehicle
- Improper snow removal techniques
Oxidation and Fading
This chalky, dull appearance comes from:
- UV radiation breaking down clear coat molecules
- Environmental pollutants embedding in the paint surface
- Lack of protection (no wax or sealant)
- Age and neglect over time
Water Spots and Etching
These stubborn marks are caused by:
- Hard water minerals being baked onto the surface by sun
- Acid rain or environmental fallout
- Bird droppings left on the paint too long
- Tree sap that chemically bonds to the clear coat
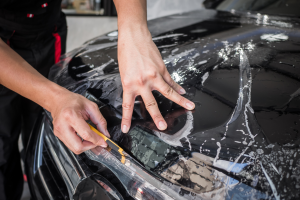
The Paint Correction Process: Science Meets Artistry
Professional paint correction isn’t just “buffing out scratches” – it’s a systematic process that requires technical knowledge, specialized equipment, and years of experience.
Step 1: Paint Assessment and Measurement
Paint thickness measurement using electronic gauges determines how much clear coat is available for correction. This prevents over-correction that could damage the paint system permanently.
Damage evaluation under specialized lighting reveals the extent and depth of imperfections, allowing us to develop the most effective correction strategy.
Step 2: Surface Preparation
Thorough decontamination removes embedded contaminants that could interfere with the correction process. This includes:
- Iron fallout removal using specialized chemicals
- Clay bar treatment to remove bonded contaminants
- Tar and adhesive removal
- Complete surface cleaning and inspection
Step 3: Correction Strategy Development
Different types of damage require different approaches:
- Single-stage correction for light swirl marks and minor imperfections
- Multi-stage correction for moderate to heavy damage
- Spot correction for isolated scratches or damage areas
- Complete paint restoration for severely neglected vehicles
Step 4: Mechanical Correction
Using professional-grade polishing machines and graduated abrasive compounds, we systematically remove damaged clear coat layers to reveal the pristine surface beneath.
Compound Application: Heavy cutting compounds remove deeper scratches and oxidation Polishing: Medium abrasives refine the surface and remove compound scratches Finishing: Fine polishes create the final high-gloss, swirl-free finish
Step 5: Protection Application
Fresh paint correction work needs immediate protection:
- Professional waxing provides temporary protection and enhanced gloss
- Paint sealants offer longer-lasting chemical protection
- Paint Protection Film provides ultimate physical protection
- Ceramic coatings deliver years of protection with minimal maintenance
Single-Stage vs. Multi-Stage Correction: Choosing the Right Approach
Single-Stage Correction
Best for: Light swirl marks, minor scratches, newer vehicles with minimal damage Process: One-step compound and polish combination Results: Significant improvement in gloss and clarity Time: 4-6 hours for most vehicles Cost: Most economical correction option
Multi-Stage Correction
Best for: Moderate to heavy swirl marks, multiple scratch depths, older or neglected vehicles Process: Sequential steps with different abrasive levels Results: Near-perfect finish with maximum gloss and clarity Time: 8-12 hours or more for complete vehicles Cost: Premium service with dramatic results
The Tools and Technology Behind Professional Results
Professional paint correction requires specialized equipment that DIY enthusiasts simply don’t have access to:
Professional Polishing Systems
- Dual-action polishers for safe, controlled correction
- Rotary polishers for heavy correction work
- Pneumatic systems for consistent power delivery
- Variable speed controls for different correction stages
Measurement and Assessment Tools
- Paint thickness gauges prevent over-correction
- LED inspection lights reveal hidden damage
- Surface contamination detection tools
- Gloss meters for objective results measurement
Professional Products
- Graduated abrasive systems designed for specific correction stages
- Machine-specific compounds optimized for different polisher types
- Temperature-stable formulations that perform consistently
- Professional-grade applicators and removal tools
Common DIY Mistakes That Make Problems Worse
Many car owners attempt paint correction themselves, often with disappointing or damaging results:
Using the Wrong Products: Consumer-grade compounds often contain fillers that temporarily mask damage rather than removing it
Inadequate Equipment: Battery-powered polishers lack the power and consistency needed for effective correction
Improper Technique: Incorrect pad pressure, speed, or movement patterns can create more damage than they remove
No Paint Thickness Monitoring: Over-correction can permanently damage the paint system
Skipping Preparation Steps: Attempting correction on contaminated surfaces embeds debris deeper into the paint
When Paint Correction Isn’t Enough: Understanding Limitations
While paint correction can achieve remarkable results, some damage requires different approaches:
Deep Scratches: Scratches that penetrate through the clear coat to the base coat may require touch-up painting before correction
Panel Damage: Dents, rust, or structural damage needs body work before paint correction can be effective
Complete Clear Coat Failure: Severely oxidized or peeling clear coat requires complete repainting
Stone Chips: Rock chips often need professional touch-up work before correction can blend the repair seamlessly
The Mississauga Advantage: Why Local Conditions Matter
Our local driving conditions create specific paint challenges:
Highway 401 Exposure: High-speed debris impacts from truck traffic create unique damage patterns that require specialized correction techniques
Urban Parking: Shopping center parking lots with cart traffic and door dings require targeted correction approaches
Seasonal Challenges: Winter road salt and summer UV exposure create combination damage that needs comprehensive correction strategies
Industrial Fallout: Local manufacturing and construction activities deposit contaminants that embed in paint surfaces
Preparing Your Vehicle for Paint Correction
Before your appointment:
- Avoid washing your vehicle for 24-48 hours (we need to assess true paint condition)
- Remove personal items from the vehicle
- Inform us of any known damage or previous repair work
- Discuss your goals and expectations for the correction process
During the process:
- Paint correction takes time – rushing compromises results
- We’ll provide progress updates and explain our approach
- Multiple stages may be needed for optimal results
- Final results are best evaluated in natural sunlight
Maintaining Your Investment: Post-Correction Care
Proper maintenance extends the life of paint correction work:
Immediate Protection: Fresh correction work needs protection within 24-48 hours Proper Washing: Use safe wash techniques to prevent new swirl marks Regular Maintenance: Professional waxing or sealing every 3-6 months Environmental Protection: Garage parking when possible, prompt removal of contaminants
Paint Correction as Foundation for Other Services
Correction work often serves as preparation for other protective services:
PPF Installation: Corrected paint provides the perfect base for Paint Protection Film Ceramic Coating: Correction removes imperfections that would be locked under ceramic coatings Professional Waxing: Corrected paint accepts and holds protective wax products better Show Car Preparation: Competition-level paint requires professional correction as foundation
The Wraptix Paint Correction Difference
Our paint correction expertise combines:
- Technical Knowledge: Understanding of paint systems and correction chemistry
- Professional Equipment: Investment in the best tools and products available
- Artistic Eye: Ability to see and eliminate imperfections others miss
- Quality Control: Multiple inspection stages ensure perfect results
- Customer Education: Helping you understand and maintain your investment
Real Results: What Paint Correction Can Achieve
Before Correction: Dull, swirled paint that looks tired and neglected After Correction: Mirror-like finish with depth and clarity that rivals showroom condition Long-term Benefits: Protected paint that maintains its appearance with proper care Value Enhancement: Dramatically improved vehicle appearance and resale value
Investment vs. Value: Understanding Paint Correction Costs
Paint correction represents a significant investment, but consider the alternatives:
- Complete repainting: $3,000-8,000+ per vehicle
- Diminished resale value: $2,000-5,000+ for neglected paint
- Ongoing frustration: Living with paint that never looks its best
Professional correction: Often achieves 90-95% of new paint appearance at a fraction of the cost.
Ready to Restore Your Paint’s Glory?
If your vehicle’s paint has lost its luster, don’t assume it needs repainting. Professional paint correction can often restore that factory-fresh appearance while providing the perfect foundation for long-term protection.
Every vehicle tells a story through its paint – let us help yours tell a story of care, quality, and attention to detail.
Contact Wraptix Autospa today to discuss how paint correction can transform your vehicle’s appearance and protect your investment for years to come.
Visit our Mississauga location for a free paint assessment and correction consultation. See what professional paint correction can do for your vehicle.
Transform tired paint into showroom perfection with professional paint correction. Contact Wraptix Autospa today for expert assessment and restoration services. Follow us @wraptixautospa for amazing paint transformation videos. #ShineWithWraptix
At Wraptix, we believe every car deserves premium care. As Mississauga's premier car detailing experts, we're passionate about sharing knowledge that keeps your vehicle looking its best. Found this helpful? Share it with someone who loves their car as much as you do!